Last Updated on October 22, 2026 by Homegrown Florida
The hardest thing to figure out when you start gardening in Florida is usually when to plant. The second hardest might be figuring out where everything is supposed to go. Thats where the winter garden layouts come in.
Winter gives us this huge selection of vegetables to grow, but those plants aren’t all the same size. A broccoli plant can take up an entire 10-gallon grow bag, while you could grow a whole bunch of radishes in the same amount of space. Some crops take months to mature, while others can be harvested and replanted before their neighbors have really gotten started.
That’s where a good garden layout can make a huge difference. I’ve put together four complete Florida winter garden layouts based on the different ways you might be growing:
- 10-gallon grow bags
- An in-ground garden
- A vertical container
- An 8×4 raised bed
You don’t have to follow any of these exactly. In fact, I hope you don’t.
Think of them as starting points. Take the vegetables you actually eat, swap out the ones you don’t, and adjust the layout to fit your space. The goal is to understand how plants of different sizes and growing speeds can fit together so you can get more out of the garden without cramming everything in.
Table of Contents
This post may contain affiliate links. Read full disclosure here.
Before You Plan Your Florida Winter Garden
There are a few basic ideas you’ll see repeated throughout these layouts.
Think About Plant Size, Not Just Spacing
It’s easy to look at a tiny broccoli transplant and think you can squeeze another plant beside it. Don’t fall for it. That cute little broccoli is eventually going to become enormous.
Broccoli, cauliflower, cabbage, collards, kale, and Swiss chard are some of the biggest plants in these layouts. They need considerably more room than carrots, radishes, onions, lettuce, cilantro, and other smaller winter crops. So we’re going to plan around the mature plant, not what it looks like on planting day.
Use Fast Crops Around Slow Crops
This is one of my favorite ways to get more out of a garden. Onions take a long time to bulb, but arugula is fast. Carrots are painfully slow, while radishes can be ready in 30 to 45 days.
That means those plants don’t necessarily need all of their eventual space on the same day. We can use the empty space around slow-growing crops for something fast, harvest the fast crop, and leave the slow crop behind to finish growing.
Succession Plant So Everything Isn’t Ready at Once
If you have room for 20 radishes, that doesn’t mean you need to plant 20 radishes today. Unless you really enjoy eating 20 radishes at once.
Instead, plant part of the space now and another section a couple of weeks later. I’ll use that strategy with lettuce, cilantro, arugula, radishes, and several other quick-growing crops throughout these layouts.
Companion Plants Don’t Have to Be Complicated
I use herbs and flowers throughout my vegetable garden, but I’m not trying to create complicated companion-planting combinations.
I’m mostly looking for plants that can bring beneficial insects into the garden, cover bare soil, provide another harvest, or simply make good use of available space. Some of my favorites for winter include:
- Dill
- Parsley
- Cilantro
- Borage
- Calendula
- Sweet alyssum
Now let’s actually build some gardens.
Layout #1: Winter Garden in 10-Gallon Grow Bags
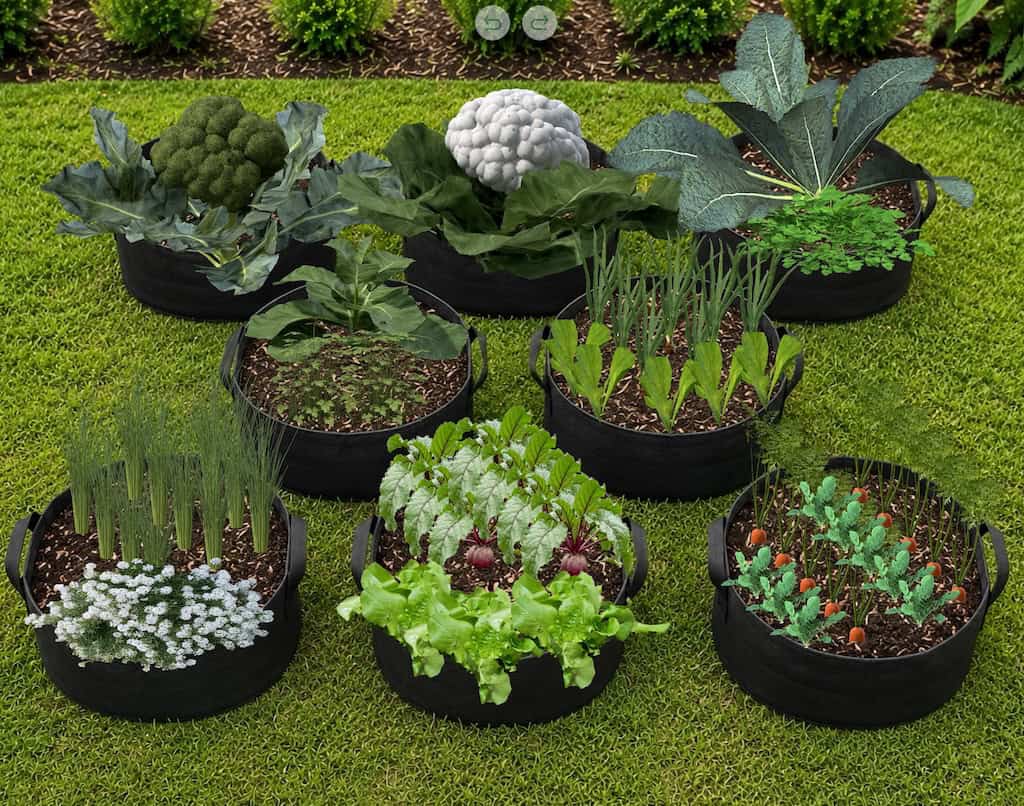
If you don’t have raised beds or an in-ground garden, you can grow a surprising amount of food in grow bags. For this layout, I’m using 10-gallon grow bags and treating each bag as its own little garden.
Broccoli
One broccoli plant gets an entire 10-gallon grow bag. It sounds excessive when you’re looking at a little transplant, but mature broccoli leaves spread out and occupy almost the entire bag.
Normally I like putting herbs such as dill around brassicas, but broccoli leaves can hang all the way over the sides of the container. There simply isn’t much usable space underneath. So this one is easy: One bag. One broccoli.
After you harvest the main head, leave the plant in place. Broccoli can continue producing smaller side shoots, so you can keep harvesting from it.
Cauliflower
The next bag gets one cauliflower. Like broccoli, cauliflower becomes a very large plant and needs the room.
The major difference is what happens after harvest. Broccoli can produce side shoots after you cut the main head. Cauliflower is essentially one and done. Once you harvest that main head, that container becomes available for something else.
That gives you an opportunity to replant the bag later in winter.
Collards + Cilantro
Our third large brassica is collards, but this time we can sneak another crop underneath. Plant one collard plant in the center.
Unlike broccoli and cauliflower, you’re continually removing the lower outer leaves from collards. As you harvest, the plant develops more of a V shape with open space around the bottom. That’s where I’d grow cilantro.
Instead of planting the entire ring of cilantro at once, divide the outside of the bag into quarters. Plant one quarter, wait a week or two, plant the next, and continue working your way around the container. By the time you’ve planted the last section, you’ll be close to harvesting the first. Then start over.
Kohlrabi + Parsley
Kohlrabi is much smaller than broccoli or cauliflower, so we can fit several plants into one 10-gallon grow bag. I’d plant four or five kohlrabi.
If you plant four, you’ll have more room for larger bulbs. If you squeeze in five, they’ll probably be somewhat smaller, but smaller kohlrabi can also be extremely tender. Think softball size versus baseball size.
For a companion, add one parsley plant. I wouldn’t add more than one. Parsley becomes surprisingly large and fluffy, while kohlrabi stays fairly short. Put the parsley toward one edge so it can spill outward instead of crowding the kohlrabi.
Onions + Arugula
This is one of my favorite combinations because onions take a long time and arugula doesn’t. Space your onions approximately 3 to 4 inches apart if you want good-sized bulbs. Depending on the dimensions of your grow bag, you may be able to fit around nine. Then use the open spaces between and around them for arugula.
You can succession plant the arugula in sections just like the cilantro. By the time the onions really need that extra space, you’ll already be harvesting the arugula.
Seeds, Starts or Sets?
For Florida bulbing onions, I prefer seeds or starts, particularly starts. I can grow onions from seed, but starting them in August and September can involve a lot of babysitting. They need plenty of sun, but they don’t appreciate being waterlogged by our heavy late-summer rains.
Starts are little young onion plants that are already established and ready to go into the garden. I’ve had excellent results with them. Last season, my Vidora onions gave me one of my best onion harvests ever.
I’m less enthusiastic about sets. Sets are small onion bulbs that began growing previously, were harvested and dried, and are replanted the following season. In my experience, they’re more prone to bolting here, and it can also be difficult to find sets of the short-day onions we need in Florida.
Garlic + Sweet Alyssum
Garlic gets another bag. Garlic is planted from individual cloves, but here in Florida there’s an extra step.
We don’t get enough winter cold to give many garlic varieties the chilling period they need, so I put my seed garlic in the refrigerator before planting. We essentially trick it into thinking it experienced winter. Then I plant between approximately Thanksgiving and Christmas.
One of my favorite varieties is Inchelium Red. If all you can find is grocery-store garlic, you can certainly experiment with it. You may end up with green garlic instead of properly formed bulbs because you don’t know whether that particular variety is suited to Florida. It isn’t necessarily a waste. The greens and undeveloped base are still edible.
Around the garlic, I’d add sweet alyssum. It stays low, attracts beneficial insects and pollinators, covers the soil, and helps shade and insulate the soil around the garlic.
Beets + Lettuce
For another bag, combine beets with loose-leaf lettuce. Space the beets around 3 to 4 inches apart so their roots have room to develop. Then plant lettuce in the open spaces. I specifically like loose-leaf lettuce here because you can begin harvesting individual leaves long before a full head of lettuce would be ready.
The lettuce is fast. The beets are slower. That difference is exactly why the combination works.
Carrots + Radishes
This might be the most interesting combination in the entire grow-bag layout. Radishes can germinate in just a few days. Carrots can take up to 21 days.
Planting radishes with carrots means those quick radish seedlings begin covering the soil while you’re still waiting for the tiny carrot seedlings to appear.
Then comes the second advantage. Radishes can be harvested in roughly 30 to 45 days, while my carrots frequently take closer to 120 days despite what that optimistic little seed packet says.
So by the time the carrots really need room for their roots, the radishes are gone. You can potentially fit around 16 small radishes in the bag and even get more than one round before the carrots need the space.
That’s the kind of companion planting I really like. We’re not just saying two plants are “friends.” Their growth habits actually make sense together.
Layout #2: A 100-Square-Foot In-Ground Winter Garden
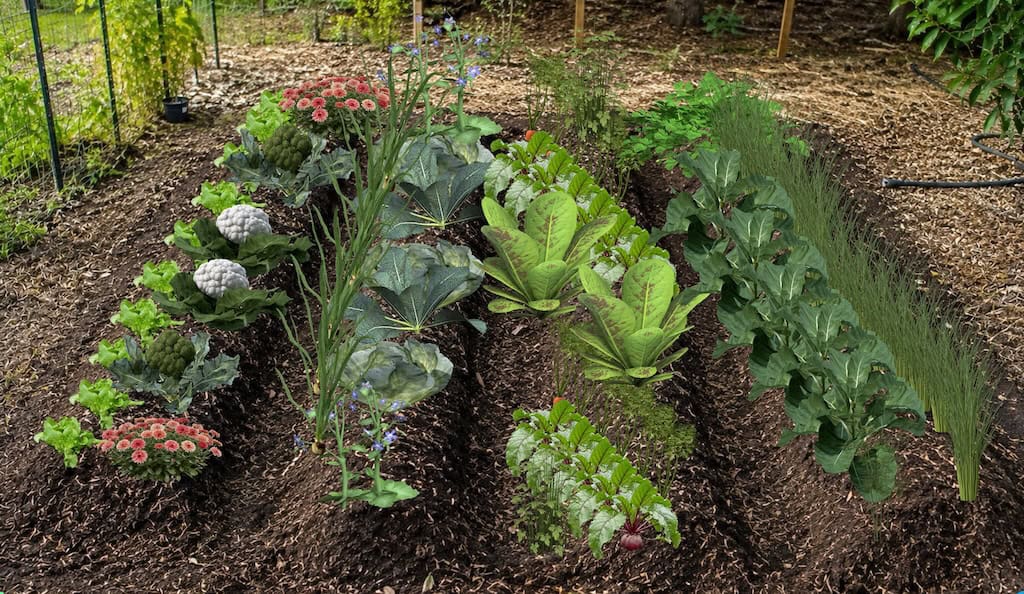
For the in-ground garden, imagine approximately 100 square feet divided into four growing rows. Each row is roughly 10 feet long and 2 feet wide. If you have more space, extend the rows or repeat the layout. If you have less, shorten it.
Row 1: Lettuce, Broccoli, Cauliflower & Calendula
Start with a line of lettuce along the outside. You can plant all of it at once, but that’s going to be a lot of lettuce. I’d rather plant approximately half, wait, and then plant the other half. Even cut-and-come-again lettuce eventually starts looking rough. After about 60 days, I usually want fresh plants coming along to replace it.
On each end of the row, add calendula. I love calendula for winter. I’ve had it survive temperatures around 21°F without protection. Then use the main growing area for broccoli and cauliflower.
I’d plant: Broccoli → Cauliflower → Broccoli → Cauliflower
You don’t have to alternate them, but I like breaking things up when I can.
Row 2: Onions, Kale, Cabbage & Borage
Run onions along the outside of the second row. Red, yellow or white are all options as long as you’re choosing the appropriate onions for Florida.
For the larger plants, put kale in the center and cabbage toward either side. This is a good place to play with maturity times. On one side, you could grow a faster cabbage such as Early Jersey Wakefield. On the other, grow something slower such as a Savoy type. Plant them at the same time and let the varieties create your succession for you.
At the ends, add borage. Borage attracts pollinators, and both the flowers and leaves are edible. I love a plant that can do more than one job.
Row 3: Beets, Carrots, Swiss Chard, Collards & Parsley
Think of this row like a three-lane highway. The two narrow outside lanes hold small root crops. The large center lane holds big leafy vegetables. Put beets along one outside edge. If you think you don’t like beets because they’re too earthy, try a white variety such as Avalanche. I prefer those for myself. My husband loves pickled beets, so I still grow the traditional red and yellow ones for him.
The opposite edge gets carrots. Carrots can be planted very closely. I usually broadcast the seed and thin them later to around 1 to 2 inches apart.
In the center, plant a few Swiss chard and collard plants. Both get large, so don’t overdo it. Parsley can go toward the ends as your companion herb.
Row 4: Kohlrabi, Garlic, Cilantro & Dill
The final row starts with kohlrabi along the outside. Kohlrabi grows fairly quickly, and it stores incredibly well in the refrigerator. Because of that, I don’t feel as strongly about succession planting it. You can plant a larger crop and store what you don’t immediately eat.
The center of this row is garlic. Give your garlic approximately 4 to 6 inches between cloves. More room generally means less competition as the bulbs develop.
At one end, plant a patch of cilantro. You can broadcast the seeds rather than carefully placing individual plants. Harvest it by cutting it down and allowing it to regrow, or continue reseeding the area.
At the other end, add dill. Dill is tall, but it’s wispy enough that it doesn’t create a dense wall of shade. I particularly like having plenty of it around brassicas.
Layout #3: A Vertical Winter Garden
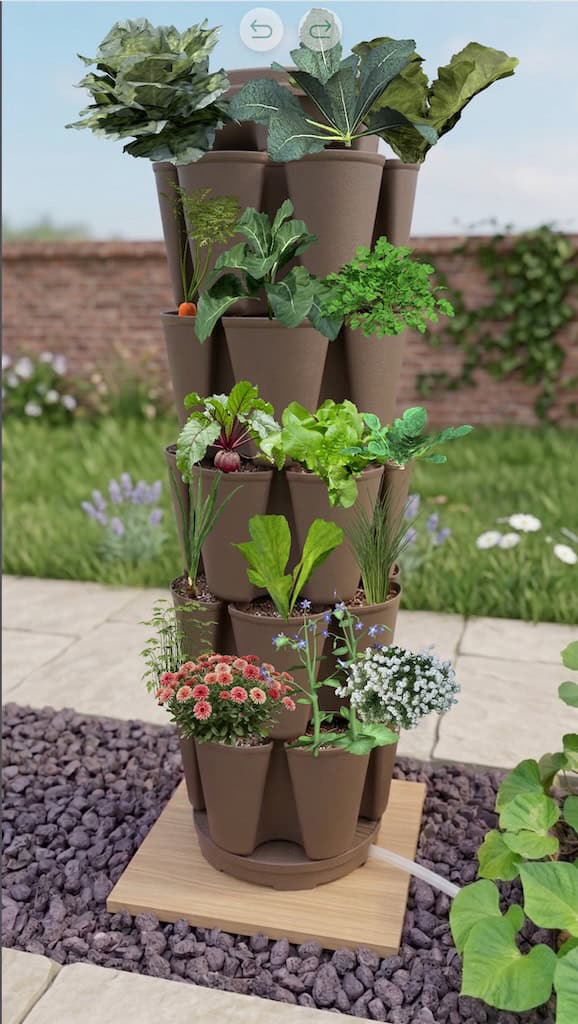
Vertical containers are one of my favorite solutions for people who tell me they don’t have enough room to garden. Apartment balcony? Tiny patio? Small backyard? Go up.
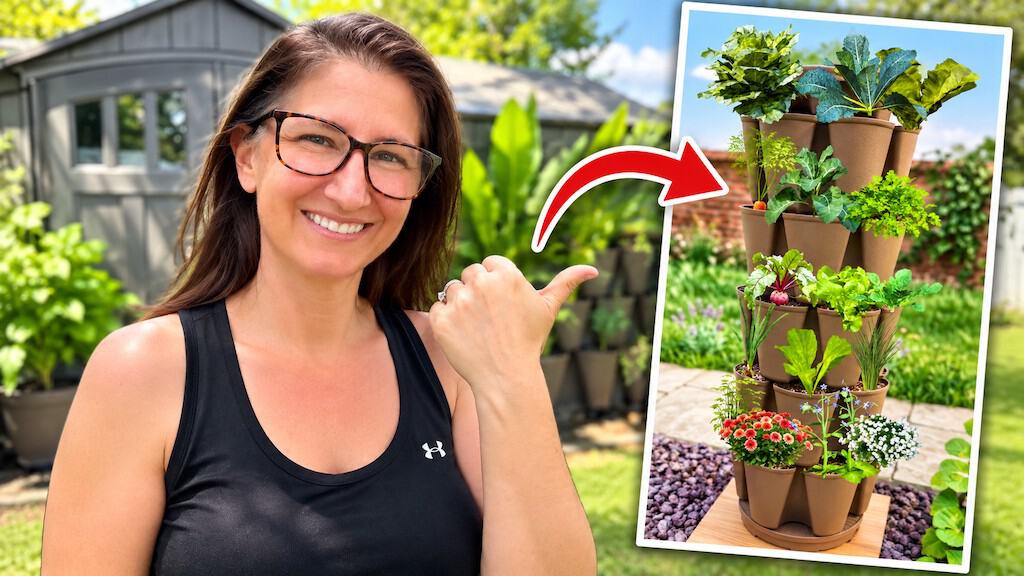
A five-tier vertical planter can hold around 30 plants or more in roughly two square feet of ground space, depending on what you’re growing. I use GreenStalks, but you don’t necessarily have to use that brand. Whatever you choose, I would pay attention to pocket depth and the quality of the plastic. Very shallow pockets severely limit what you can grow.
Here’s how I’d arrange a winter vertical garden from bottom to top.
Bottom Tier: Companion Plants
I like putting many of my herbs and flowers on the bottom. For this tier, I’d use a combination of:
- Parsley
- Borage
- Calendula
- Sweet alyssum
You can absolutely swap these for your own favorite winter herbs and flowers.
Second Tier: Onions, Arugula & Garlic
The next level gets onions, arugula, and garlic. You can grow bulbing onions or green onions. One of my favorite perennial green onions for Florida is Florida Finley, which would also work here.
Arugula can fit several plants into a pocket, while I would give individual garlic cloves their own pockets. Remember that there are pockets all the way around the planter. If you eat a lot more arugula than onions, give arugula more of them. The layout isn’t a rule.
Third Tier: Beets, Radishes & Lettuce
Now we can use some of our smaller root crops. I’d give a beet its own pocket unless you’re specifically growing baby beets. Small radishes such as Cherry Belle can be planted more densely, potentially around three per pocket.
For lettuce, again, I prefer loose-leaf varieties. You might fit several loose-leaf plants into a pocket and begin harvesting early. If you want a full heading lettuce, stick with one plant.
Fourth Tier: Carrots, Kohlrabi & Cilantro
Yes, you can grow carrots in a vertical planter. I’ve done it. You need a container with enough depth, though. I want approximately 12 inches, which is why I prefer the deeper original-size GreenStalk pockets rather than the shallower version for carrots. I also wouldn’t choose the longest carrot variety you can find.
I’ve grown shorter varieties along with varieties such as Kuroda and Purple Elite successfully. One thing I really like about growing carrots this way is the loose soil. The carrots tend to come out beautifully shaped. Add kohlrabi to another pocket and cilantro to the others.
Top Tier: Cabbage, Kale & Swiss Chard
This is where I do something a little controversial. I put the big plants on top.
The typical advice is often to put larger plants lower so they don’t shade everything underneath. But in my Florida garden, I’ve found that large plants on lower tiers tend to grow outward and upward into the tier above them anyway.
On top, they have room to spread. Is putting your cabbage on the bottom instead going to destroy your garden? No.
This is definitely not something I’d lose sleep over. For cabbage, choose a smaller variety such as Green Acre, Red Acre, or Early Jersey Wakefield rather than a giant cabbage.
Then add kale. Lacinato or Red Russian are both possibilities. For the final large leafy green, you could use Swiss chard. I’m not a huge Swiss chard person, so I’d probably replace mine with a mustard, mizuna, or another Asian green.
You can also tuck tall, airy herbs such as dill or borage into some of the remaining upper pockets.
Layout #4: An 8×4 Raised Bed Winter Garden
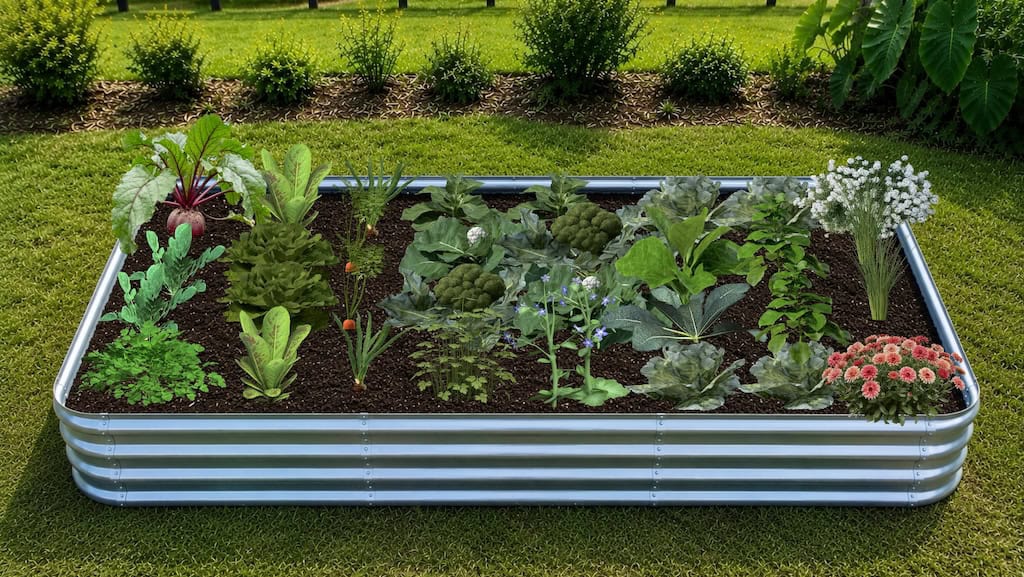
Now we get to my favorite. The raised bed. This layout uses an 8×4-foot bed, but the important part isn’t having that exact bed.
I want you to mentally divide your bed into square feet. An 8×4 has 32 squares. A 6×3 has 18. If your bed is a different size, take the individual pieces of this layout and build your own version. This is loosely inspired by square-foot gardening, but I’m not strict about following every square-foot gardening rule. I prefer keeping things simple.
Keep the Biggest Plants in the Center
My basic strategy is: Big plants toward the center. Small plants toward the edges.
I use this approach partly because my own raised beds aren’t even oriented consistently. Some run one direction and others run the opposite direction. Putting the largest plants in the center and smaller crops toward the perimeter makes the layout more forgiving regardless of bed orientation.
Winter also makes this easier because our sunlight isn’t nearly as intense as it is during summer.
Beets, Radishes & Cilantro
Starting along one side, give one square foot to beets. I’d aim for approximately four to six beets per square foot, depending on the final size you want. Next, dedicate two square feet to radishes. You can fit roughly 9 to 16 radishes per square foot because they’re so small. But please don’t plant all of them on the same day unless you really, really like radishes.
Plant one square. Wait a couple of weeks. Plant the next.
At the front, dedicate another square to cilantro. Broadcast the seed and harvest it cut-and-come-again, or divide the square into sections for succession planting.
Lettuce & Arugula
The next strip can become your salad section. Put arugula toward the outside with lettuce between it. I like arugula along the edge because it’s tough, fast, and makes good use of those outside squares. Use loose-leaf lettuce if you want to harvest repeatedly rather than waiting for full heads.
Onions & Carrots
Next come our root crops. Put onions toward the outside and carrots toward the center. You can grow whatever type of onion makes sense for your garden: bulbing onions, green onions, perennial onions, or walking onions. For bulbing onions, I’d use approximately four to six per square foot depending on spacing.
Carrots can be much denser, around 9 to 16 per square foot. I generally wouldn’t succession plant the carrots by only a week or two because they’re so slow. If you want separate carrot harvests, space the plantings much farther apart, perhaps a month or more.
Kohlrabi, Broccoli & Cauliflower
Now we’re entering the center of the bed, where the plants get larger. Use individual square feet for kohlrabi, broccoli, and cauliflower. I’d alternate broccoli and cauliflower rather than putting all of one together. Remember that these are big plants.
We’re not squeezing four broccoli plants into one square. One large brassica gets the square.
Parsley & Borage
Use some of the neighboring spaces for parsley and borage. These give us herbs and flowers mixed among the vegetables without requiring a completely separate herb or pollinator garden.
Cabbage, Kale, Collards & Swiss Chard
The remaining center portion of the bed is where I’d put some of our biggest winter vegetables. Cabbage can go toward the ends of these sections, with kale, collards, and Swiss chard occupying the central spaces. Again, we’re generally talking about one large plant per square foot.
And don’t feel obligated to grow Swiss chard just because I put it in the layout. This is where you can have some fun. Replace it with mizuna, mustard greens, Asian cabbages, or another winter green you actually enjoy eating. You could even start swapping other root crops around. Instead of carrots, try daikon.
You could take the whole concept in a completely different direction and build a garden around vegetables you use for kimchi. That’s the fun part once you understand the basic structure.
Garlic, Sweet Alyssum & Calendula
Along the final outside section, add garlic with sweet alyssum and calendula. Keep garlic around 4 to 6 inches apart if you want good bulb development. Then use the flowers at the edges. They aren’t taking valuable center space away from our largest vegetables, and they give us more diversity around the perimeter of the garden.
How to Customize Any of These Winter Garden Layouts
These aren’t meant to be blueprints that you have to copy plant for plant. Maybe you hate beets. Don’t grow beets.
Maybe your family eats lettuce every day but nobody will touch kale. Give yourself more lettuce squares and skip the kale.
The easiest way to customize a layout without completely changing how it works is to swap plants with something that has a similar growth habit. A few examples:
- Replace one leafy green with another leafy green.
- Swap a large brassica for another large brassica.
- Replace Swiss chard with mustard greens or mizuna.
- Swap one small root crop for another.
- Replace one herb or flower with a companion plant you prefer.
You can also adjust quantities. If you eat tons of carrots, give carrots another square. If you don’t need 18 radishes, use one square instead of two. The point isn’t to maximize every square inch until the garden is bursting at the seams.
We’re already getting a tremendous amount of food from these layouts. Give your plants some room.
Build a Winter Garden That Fits the Space You Actually Have
You don’t need an 8×4 raised bed to have a productive Florida winter garden. You don’t even need a yard.
Eight grow bags can become eight little gardens. A vertical planter can fit dozens of plants into a couple of square feet. A small in-ground plot can combine quick crops, long-season vegetables, herbs, flowers, and cut-and-come-again greens. And if you do have a raised bed, thinking about it in individual square feet makes planning much easier.
More importantly, you don’t have to grow everything. Use these layouts like building blocks.
Start with the vegetables your family actually eats. Put your largest plants where they have room to spread. Fill smaller spaces with carrots, radishes, onions, herbs, and lettuce. Take advantage of quick crops while slower vegetables are still developing. And stagger some of those fast crops so your entire garden isn’t ready for harvest on Tuesday.
Once you start looking at a garden this way, layout gets much easier. You’re not trying to find one perfect companion for every vegetable.
You’re figuring out what fits, what grows at the same time, what finishes first, and how you can use that space again. And that’s a much simpler way to plan a Florida winter garden.