Last Updated on February 19, 2026 by Homegrown Florida
Not too long ago, someone asked me a question that stopped me in my tracks “How long did it take for your soil to become fertile and actually improve your yields” If you have ever felt confused by soil fertility, you are not alone. When I first started gardening, everyone repeated the same line: Focus on the soil, Feed the soil, Healthy soil grows healthy plants.
All completely true. Also completely useless if no one tells you what to do with that information.
Do you add compost once a year?
Do you buy expensive bagged soil every season?
Do you fertilize every week forever?
In this post I want to walk you through what actually worked in my own garden. It is a simple three year plan that turned my sandy Florida soil and fresh raised beds into dark, crumbly, living soil that grows stronger plants and better harvests.
You do not have to follow every single step. You can pick and choose what makes sense for your time and budget. But if you follow most of it, you will see a difference.
Table of Contents
This post may contain affiliate links. Read full disclosure here.
One quick mindset shift before we start. The fertilizer brand, the label, and the perfect schedule you found online matters way less than what your soil is actually missing. I learned that the hard way when I accidentally over fertilized my garden, yes, even with organic fertilizer. More fertilizer does not always equal healthier plants. Sometimes it creates the exact problems you are trying to solve.
Step One
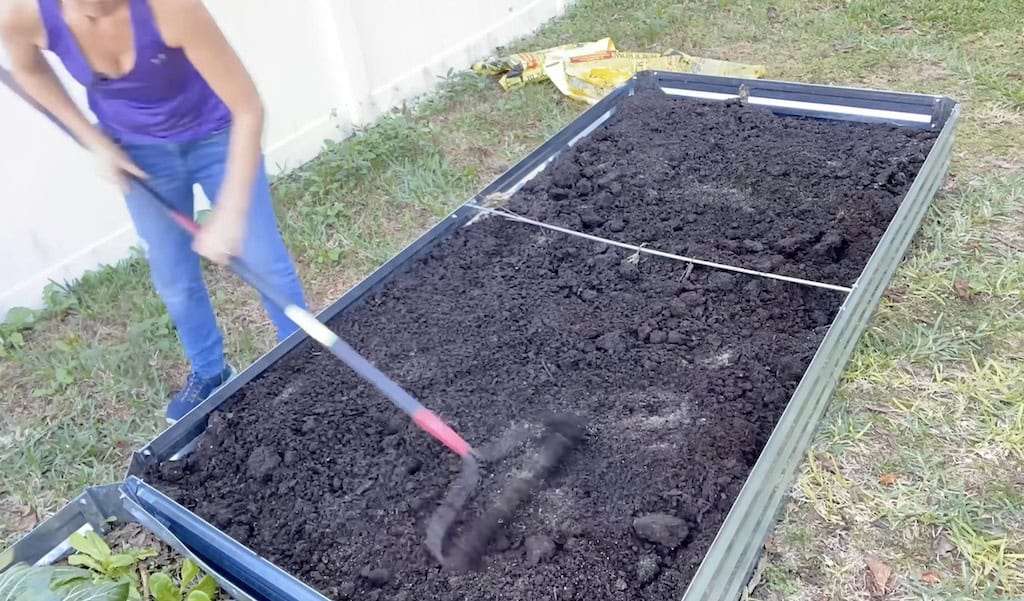
Start With A Bed You Can Actually Improve. This plan works whether you grow in raised beds, in ground, or containers. You just approach the “starting line” a little differently.
Raised beds
I like to think of raised beds as a shell that you slowly turn into real soil. You can fill them with a cheaper bulk mix and then build fertility on top with compost, amendments, and mulch. I have a whole separate method for filling beds inexpensively, so I will not go deep on that here, but the short version is
• cardboard or organic material on the bottom
• chunky organic matter like wood chips or sticks in the middle
• compost and soil mix on top
One important note if you use wood mulch or woody material in the bed build. The first year can feel harder because those materials can temporarily tie up nitrogen while they break down. That does not mean the method is bad. It just means year one needs more intentional feeding while everything wakes up.
In ground beds
You can absolutely improve native soil fertility. In Florida that usually means sand. For in ground beds I like to bring in compost, mushroom compost, or composted manure and slightly mound the bed so it drains well but still holds moisture.
Containers
Containers are pickier. Use a good quality potting mix and then treat the surface the same way you would a bed. Compost, amendments, mulch. Garden soil straight in a pot usually compacts and drains poorly.
Once you have a place for your plants to live, then the soil fertility journey starts.
Year One: Foundation Year for Soil Fertility
Think of year one as the “set everything in motion” year. The goal is not perfect soil fertility in twelve months. The goal is to get the biology going, protect it, and feed it regularly so it can do its job.
Also, year one is when most people panic and overdo it, because the beds are new and the plants act hungry. I did that too. Fertilizer is helpful in year one, but more is not always better. If you keep increasing fertilizer because your plants look off, you can accidentally create nutrient lockout where the soil has plenty, but the plant cannot take it up correctly.
Month One: Fill, Amend, Mulch, and Start Compost
When I set up a new bed, here is what I do in that first month.
- Fill the bed or prep the ground
Enough depth for roots, decent texture, and a surface you can work with. - Add a light round of amendments
This is not about perfection. At the beginning I like to add gentle, organic amendments such as
• bone meal
• blood meal
• kelp meal
You can skip this if money is tight and focus just on compost and mulch, but it does speed things up. A quick caution here. These are powerful tools, especially bone meal and other phosphorus sources. In Florida, excess nutrients do not just sit quietly. Heavy rain and sandy soils can move things fast. That is another reason I prefer “light round” instead of “blanket the bed like frosting.” - Cover everything with mulch
Bare soil is not your friend. Mulch keeps moisture in, protects from the sun, and slowly turns into food for soil fertility life. Some good options:
• grass clippings without herbicides
• fallen leaves
• shredded plant debris from your own garden
• wood chips from a tree company or county dump
• straw
In year one I like smaller pieces. They break down faster and start feeding the soil sooner. - Start a compost system
This is your long term fertility engine. It does not have to be fancy.
• a tumbler works great if you have one or two beds
• a simple pile of alternating browns and greens in a corner works too
• chicken wire circles filled with leaves, bedding, and kitchen scraps are another cheap option
The point is to stop throwing organic matter in the trash and start turning it into future soil.
You do not have to do this perfectly. Just get something going.
Months 2-12 In Year One: Fertilizer, Mulch, Cover Crops, Compost
After that first setup month, I follow a simple pattern for the rest of year one.
Organic fertilizer schedule

If you are serious about soil fertility, this is where I would put some money if you can. Organic fertilizers feed the soil first, and the soil feeds the plants. Synthetic fertilizers can grow a big pretty plant, but the soil usually gets left behind. Some brands I have used and liked
• Espoma GardenTone
• Down to Earth
• Dr Earth
• Alaska fish fertilizer
• Neptune’s Harvest
I also really like a bulk chicken manure based fertilizer called Nutri Rich. It comes in a forty pound bag and has an N-P-K of 4-3-2. I bought two bags and they lasted me around two years. Buying in bulk like that dropped my cost a lot.
Here is the biggest update I want to add from experience. The brand and label matter less than the numbers and the need. I used to think I had to try every brand and follow a perfect schedule. What I learned is that if your soil is already high in certain nutrients, adding more can make plants sluggish, discolored, and weirdly unhappy even though you are feeding them. That was my clue that something was off.
In year one I use fertilizer more often, then taper off as the soil fertility improves. A simple pattern looks like this.
- once about a month after you set up the bed
- again two months later
- again three months later
- and then one more time about six months after that
Nothing fancy. Just a way of feeding regularly while the soil biology is waking up.
If you use liquid fertilizer in year one, especially fish emulsion, keep it lighter than you think and do not assume weekly feeding is required. It is very easy to get into a habit where you are feeding because the calendar says so, not because the plants or soil actually need it.
Mulch top ups
Mulch is not a one and done job. It breaks down, which is exactly what you want. That is how it turns into soil. In year one I usually refresh mulch twice.
- once in late spring before the serious heat arrives
- once in early fall before the main cool season planting
Early on I use smaller mulch materials like shredded leaves, grass clippings, and fine wood chips because they disappear quickly and feed the soil fertility faster. Later, once the soil is in better shape, I switch to chunkier mulch, like pine bark nuggets, that lasts longer.
Summer cover crops in Florida
If you garden in Florida, summer is the perfect time to let cover crops do the work while the rest of the garden wants to melt. Three that have done really well for me:
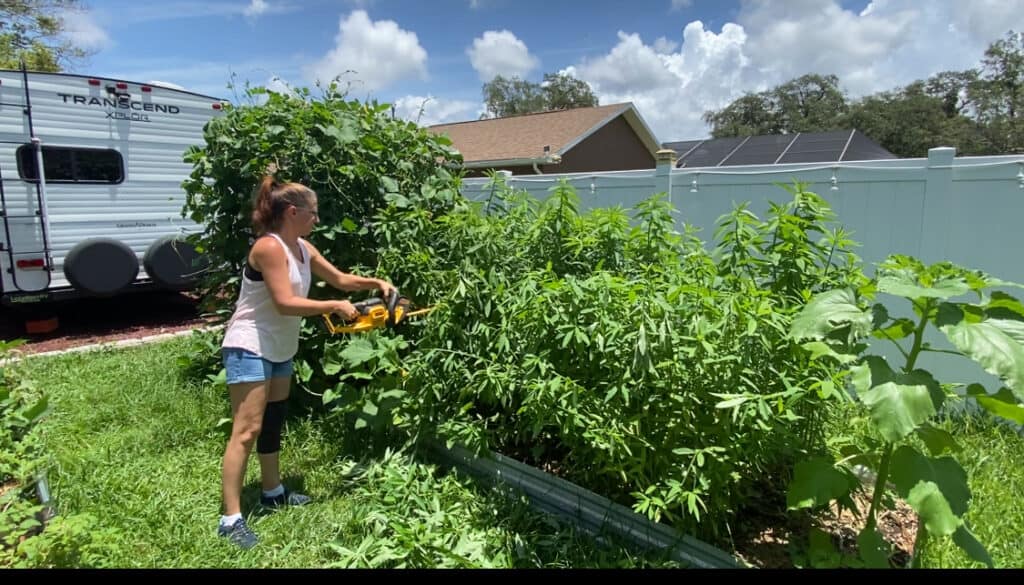
- Sunn hemp – Produces a huge amount of green material and fixes a lot of nitrogen.
- Cowpeas – You can literally buy a bag of dry black eyed peas at the grocery store and plant those for cover. They do not have to produce well. Their job is to grow, be cut down, and feed the soil.
- Peanuts – Raw peanuts from the produce section work. Plant them about twelve inches apart, let them grow, then chop and drop them into the bed.
All three are legumes, which means they are very good at capturing nitrogen and feeding it back into the soil. If you live farther north, cover crops usually fit at the very beginning and very end of your growing season instead of in the middle of summer.
One more reason I love cover crops now is that they help use up excess nutrients too. If you ever get a soil test back and realize you are high in something, growing a hungry cover crop and then removing or composting the biomass can help rebalance things over time.
Using your own compost for the first time
If you started a compost system at the beginning of the year, you should have something usable by about month ten. It does not need to be perfect. If you no longer see obvious chunks of food scraps, paper, or leaves and it mostly looks like dark crumbles, it is ready enough.
I almost always treat compost like a mulch, not a potting mix. I spread it on top of the bed, then put a layer of regular mulch over it. That way if it is still a little “hot” it will not burn any roots.
By the end of year one you will probably not have magical black earth everywhere, but you should notice that the soil is darker, holds moisture a bit better, and has more life when you dig into it.
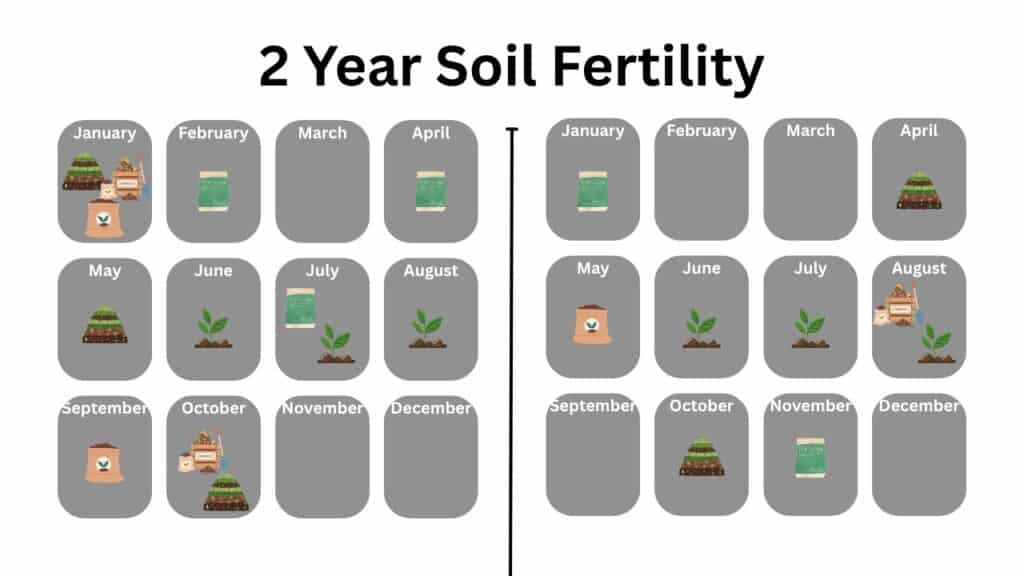
Year Two: Leaning More on the Soil and Less on the Bag
Year two is where things start to feel different. You are not rebuilding from scratch anymore. You are feeding and adjusting. Here is how I simplify things in the second year.
- Organic fertilizer only twice in the whole year instead of several times
- Refresh mulch twice a year with slightly larger pieces
- Plant a summer cover crop
- Add a layer of compost once during the year
- Add amendments more thoughtfully and ideally after a soil test
I am going to emphasize that last line. The soil test is what changed everything for me. I was following “good advice” and still ended up with problems because my soil had excess phosphorus and potassium from years of feeding. I assumed my plants were deficient, so I fed more, which made things worse. The soil test showed me the issue was not lack of fertilizer. It was too much of the wrong thing.
If you run a soil test at the end of year one or sometime during year two, you can stop guessing. Instead of throwing every amendment at the bed, you can pick the ones you actually need.
By the end of year two, most gardeners start to see a big difference. When you dig, the soil is darker and more crumbly. Mulch disappears faster because the life underneath it is busy. Roots travel deeper. Plants usually handle stress better and bounce back more quickly.
Year Three And Beyond: Maintenance Mode
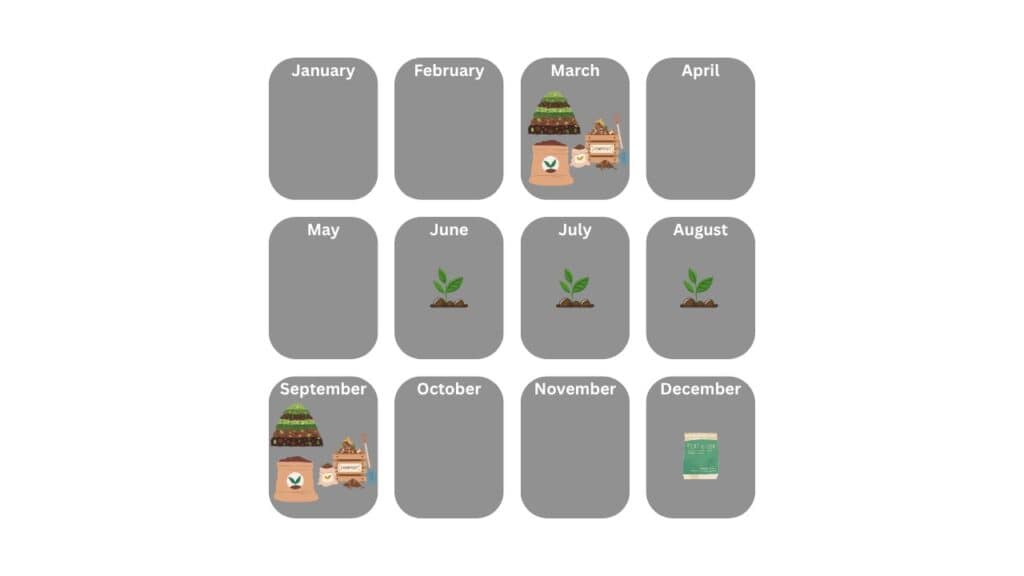
By year three, you are not “fixing your soil fertility” anymore. You are maintaining and fine tuning. At this stage I think in seasons rather than products.
- Twice a year I do a full soil building pass.
- Once a year I decide if any beds truly need fertilizer.
Here is what that looks like in my Florida garden.
Spring and fall soil building
In my climate that is March and September. If you are in a different state, think “beginning of the main season” and “end of the main season” and adjust the months.
During those two windows I:
- Add any amendments that soil tests say I need
- Spread a layer of compost across the beds
- Top everything with a fresh layer of chunky mulch that will last until the next pass
That is it. No complicated chart on the fridge, just a twice a year habit.
One extra option I want to add here. If your soil test shows a specific deficiency, you can use targeted amendments instead of general fertilizer. For example, if nitrogen is low, blood meal is a direct tool. If potassium is low, kelp meal might be enough for mild deficiency and potash can be used carefully for bigger gaps. If your phosphorus is showing deficient, apply bone meal. This is where you get to spend less money and get better results, because you stop paying for nutrients you already have.
Optional fertilizer once a year
Around the middle of my main growing season, I walk through the garden and really look at each bed. If something is yellowing, not flowering well, or just looks a little tired even though water and light are good, that bed gets one round of organic fertilizer. If the bed looks happy, I skip it. By this point the soil fertility is doing almost all of the heavy lifting and fertilizer becomes a tool instead of a crutch.
If you want to be extra intentional, do a soil test once a year or once every two years. It is the simplest way to avoid the slow creep into over fertilizing again.
How You Know It Is Working
You do not have to guess when your soil fertility has turned the corner. You will see it.
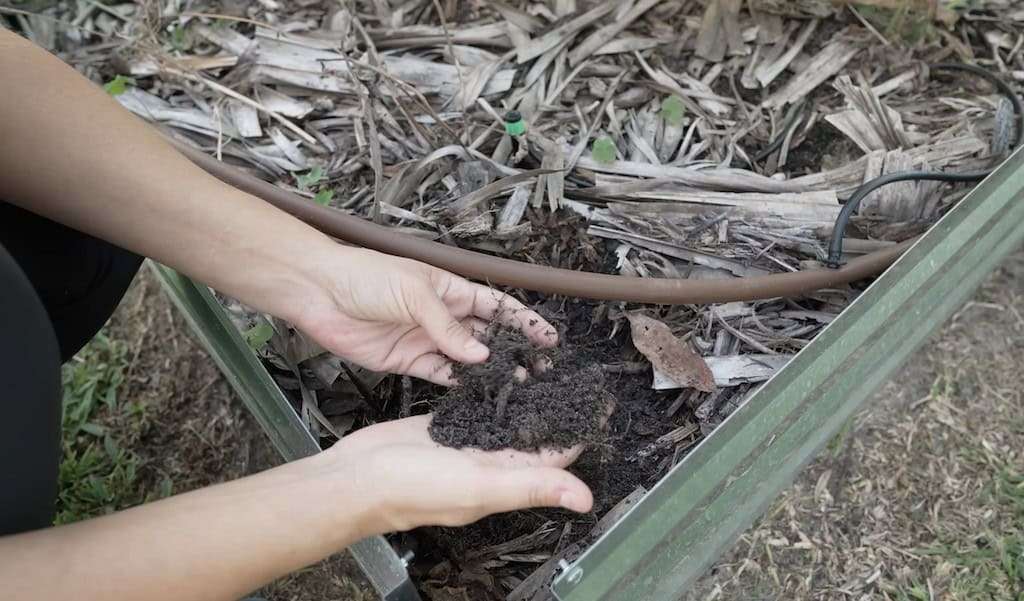
- The color shifts from pale and sandy to darker brown
- The texture changes from loose and dusty to crumbly and slightly sticky
- Worms show up every time you dig
- Mulch disappears noticeably between seasons
- Plants recover more quickly from heat, cold, or pests
- You can miss a fertilizer round and nothing crashes
One more sign I want to add. Your garden stops needing constant input. The first year can feel like babysitting. By year three, it feels like the soil is working with you instead of fighting you. It does not happen overnight, but it also does not take decades. With a steady routine over three seasons, your soil can transform a lot faster than most people think.


Hope Gorrondona
Is there a way to print this chart? BTW thanks for doing this. I live in South Louisiana and many of your tips work here.
Homegrown Florida
Yes, you can either print the webpage or right click on the image and save then print it. Hope that helps