Last Updated on November 28, 2025 by Homegrown Florida
When I first started expanding my garden, I wanted raised garden beds that would last longer than a season without draining my bank account. That is a tall order in Florida where the heat, rain, and humidity seem determined to break everything down as fast as possible.
I have been growing in these budget friendly galvanized steel beds for several years now, and it feels like a good time to give a real review. I will walk you through why I chose this style, what I like, what I do not like, how I fill them without spending a fortune, and how the soil looks after a couple of years in use.
If you are thinking about raised garden beds in Florida or any warm climate, this will give you a realistic picture of what to expect.
Table of Contents
This post may contain affiliate links. Read full disclosure here.
Why I Chose Galvanized Steel Raised Garden Beds Instead Of Wood
Before I bought anything, I looked at all the usual options for raised garden beds. Wood, concrete block, stone, and metal. On paper, wood seems like the obvious choice. It is easy to work with and looks nice. In Florida it is a different story.
Here is what I ran into with wood.
- Regular untreated wood breaks down fast in our climate. Think one to two years before it starts to rot and fall apart.
- Even treated wood does not last as long as you would hope once you mix in rain, humidity, and intense sun.
- Replacing a bed every couple of years is a project I did not want to keep repeating, especially once the bed is full of soil and plants.
Concrete blocks and stone are very sturdy but they felt like overkill for a small backyard garden. They are heavy, hard to move if you change your layout, and more work to set up.
That is what pushed me toward metal. I still had a few concerns though. Metal can heat up in the sun, and I did not want to cook my soil. That is why I narrowed it down to galvanized steel. It has a protective coating that helps keep the sides from getting as hot and slows down rusting.
So the short version is this. I chose galvanized steel because wood fails too fast in Florida, concrete felt too permanent for my space, and I wanted something that would last several years without becoming a constant project.
What I Like About These Beds
Once I landed on galvanized steel, I started hunting for beds that were affordable and still decent quality. That is how I found the galvanized steel raised beds that I use today.
Affordability
These beds are true budget beds. When I first bought them they were around fifty nine dollars. Prices move around a bit, but they still stay on the low end compared to most metal beds. They also go on sale a lot. If you add them to your cart and keep an eye on them, you can usually catch a better price.
Easy To Assemble
I am not naturally handy and I put all of these together myself. The panels feel a little flimsy when they are empty, but once everything is screwed together and filled with soil, they are solid. After the first bed, the rest went together much faster.
They Hold Up To Florida Weather
These beds have been through heavy rain, high heat, and even hurricanes. I have moved a couple of them across the yard after they were already in use, and they held together without bending or collapsing.
Soil Does Not Overheat
I was worried that metal sides would heat up the soil too much. In practice, that has not been an issue. I leave a small gap between plants and the edge of the bed, usually a couple of inches, and I use mulch on top of the soil. That combination has kept the soil temperature reasonable, even in summer.
Height And Open Bottom
The beds are twelve inches tall with an open bottom. That is enough depth for most vegetables, and the open bottom lets roots reach the native soil underneath if they want to.
What I Do Not Love
No product is perfect, and these raised garden beds have a few trade offs.
Open Bottom And Burrowing Pests
The open bottom is great for drainage and root growth but not ideal if you have moles, voles, or other burrowing pests. In my yard that has not been a major problem, but in some areas it could be. Hardware cloth under the bed is an option if you know you have issues.
Height And Comfort
Twelve inches is a nice depth for plants but not always for your back. If you have mobility issues or trouble bending over for long periods, you might prefer taller raised garden beds.
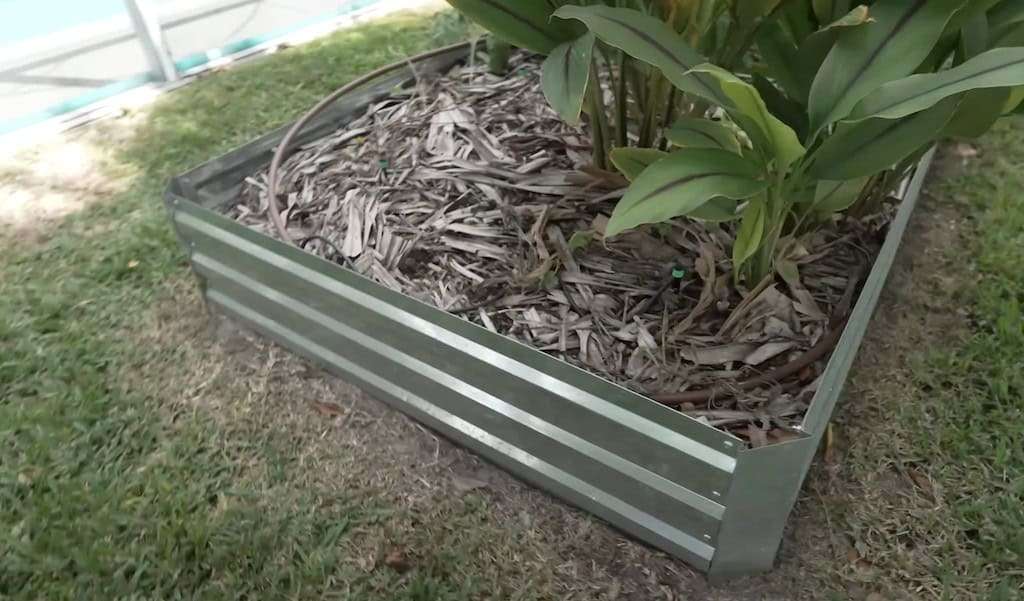
Rust Over Time
Galvanized coating slows down rust but does not stop it forever. On my oldest beds I started to see rust after several years, mostly in the spots that were constantly hit by sprinklers or where moisture sits the longest.
So far it is cosmetic and has not affected the structure. I patched one bad spot where the sprinkler had blasted the same area over and over. I also test my soil, and I have not seen anything that makes me uncomfortable about metals in the soil. My goal is to get about seven years out of each bed. For the price, I am happy with that.
Sharp Edges
Some edges can be sharp during assembly. Once they are together and in place, it is not something I notice day to day, but if you have kids or big dogs running around, you will want to be aware of it. Some people use tubing along the top edge for extra protection.
Limited Size Options
The raised garden beds I use are a basic rectangle. They are eight feet by four feet. You can adjust the length if you leave out a panel, but you do not have different shapes or heights to play with.
Which Raised Garden Beds I Actually Use
There are a lot of galvanized steel raised garden beds on the market now, and many of them look similar in photos. The ones I use are a no name brand sold through Amazon. I have bought from the same listing multiple times over several years.

They are:
- Eight feet by four feet
- Twelve inches tall
- Galvanized steel
- Open bottom
They are not one of the big fancy brands, which is part of why the price is lower. The upside is that ordering through Amazon still gives you the usual return and support options if something arrives damaged.
Because there are so many lookalikes, I always link the exact bed I use so people know they are getting the same model.
How I Fill Raised Garden Beds On A Budget
The bed itself is the cheap part. The real cost shows up when you start filling it. An eight by four foot bed at twelve inches deep can take a lot of soil if you fill it entirely with bagged mix.
Instead of buying bagged soil for the whole thing, I use a layered approach that is a lot cheaper and still gives me rich soil within a year or two.
Step One: Cardboard Layer
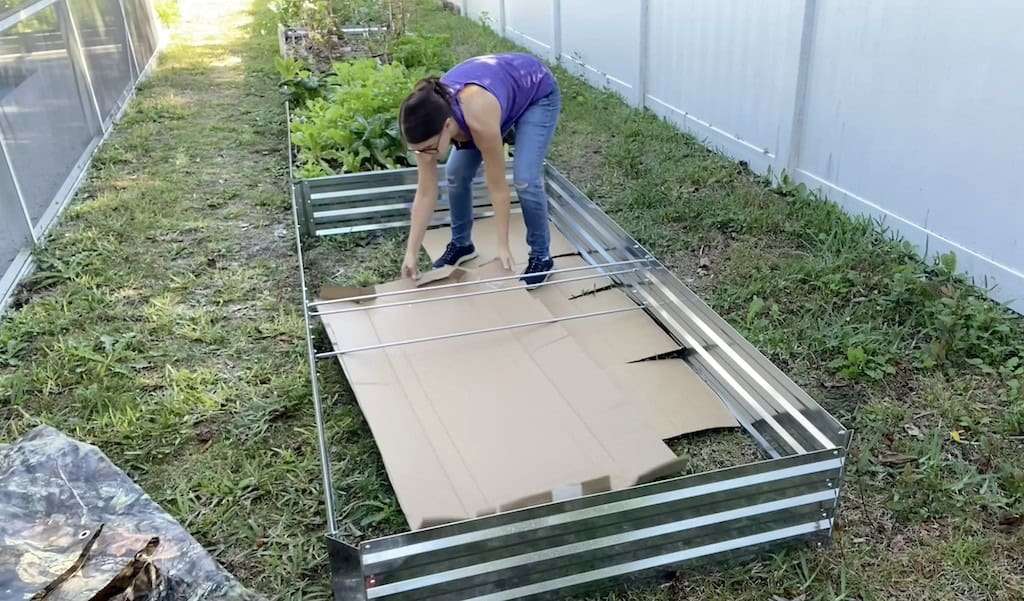
I start by laying down cardboard directly on the grass. I use two to three layers so that no grass is peeking through. This saves me from digging up sod and helps smother the grass underneath.
Step Two: Chunky Organic Material
On top of the cardboard I add sticks, small branches, old trimmings, and any woody debris I have around. If we had storm damage or tree trimming, I collect what I can. You can also add old potting soil, unfinished compost, leaves, and grass clippings. This bottom section is where I put everything that will slowly break down over time.
Step Three: Wood Chips
Once the base layer is in, I fill the bed to about seventy five percent full with wood chips. These do not have to be fancy. Here are some places I have had luck with.
- County waste or landfill departments that handle tree debris
- Local tree companies and arborists who are happy to drop a load on your driveway
- ChipDrop, which connects gardeners with arborists in their area
Sometimes there is a small fee. Sometimes it is completely free. Either way, it is much cheaper than filling a bed with bagged soil.
Step Four: Compost Layer
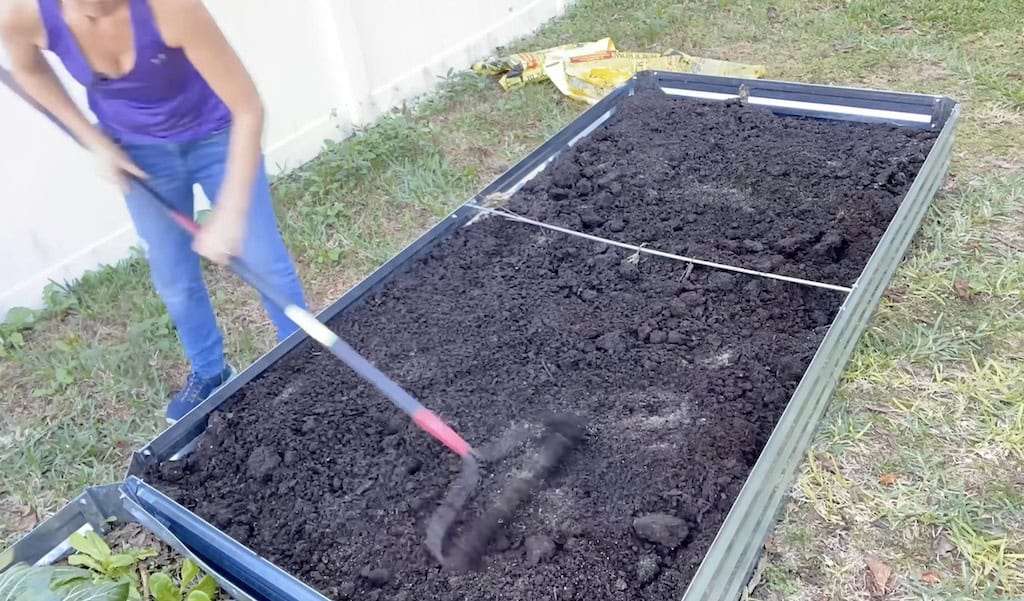
On top of the wood chips, I add a thick layer of compost. This can be homemade compost, store bought compost, or a mix of both. I aim for enough to give the top of the bed a solid zone of rich material for roots. If you are buying compost in bags, this is the only part you pay for, which keeps the overall cost much lower.
Step Five: Fertilizer And Mulch
In the first year or so, the wood chips underneath are still breaking down and they can tie up some nutrients. To keep plants happy I add a balanced fertilizer on top before planting. After planting I always mulch. Mulch helps keep moisture in, protects the soil, and continues to feed the system as it breaks down.
You can absolutely grow in these raised garden beds while the wood chips are decomposing. The first year might not be your highest yield ever, but with compost, fertilizer, and mulch, you can still get very good results while the bed matures.
What The Soil Looked Like After Two Years
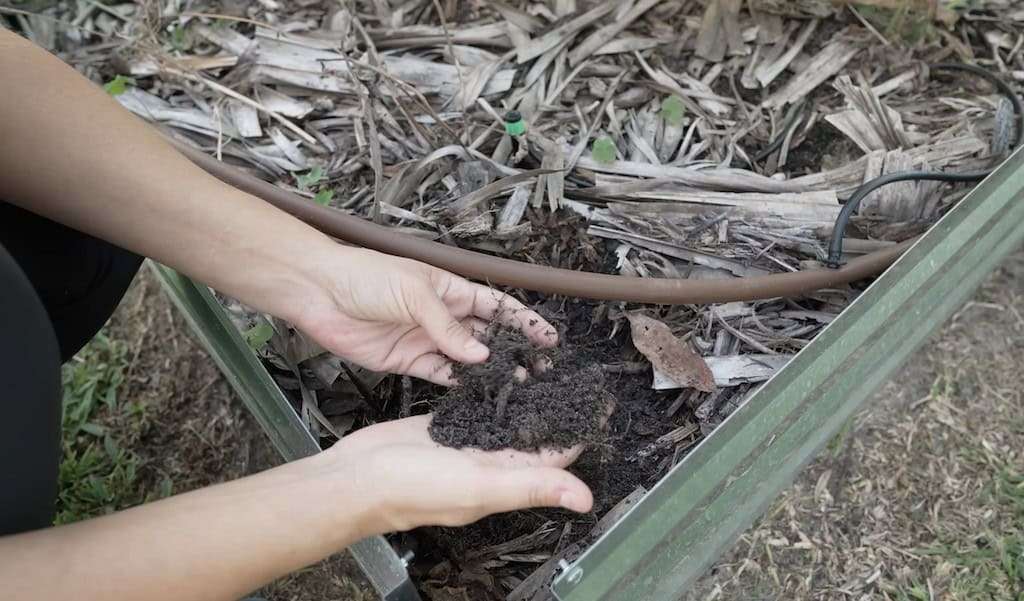
Two years after setting up one of these raised garden beds, I dug down through the mulch and compost to see what was going on underneath. The soil was dark, crumbly, and held together nicely in my hand. The original wood chips at the top had completly broken down.
At one point the soil was actually holding water too well for my liking, which is not a sentence you expect to say in Florida. I mixed in a few inches of native sand to lighten it up, and that balanced things out.
In that same bed I have grown:
- Tomatoes
- Bush green beans
- Sunflowers
- Medicinal and pollinator flowers like chamomile, calendula, and borage
- Leafy greens such as collards, kale, and mustard
- A full chaos garden experiment with lettuce, radishes, flowers, and more
The longer the bed has been in place, the better the results. Each season adds more organic matter, more life in the soil, and more productivity.
Who These Beds Are Best For
After several years with these beds, here is who I think they suit best.
- Gardeners in warm or wet climates where wood breaks down quickly
- Budget conscious gardeners who want metal beds without spending several hundred dollars per bed
- People who are comfortable with a realistic lifespan instead of expecting something to last forever
- Home gardeners who are willing to build the soil over time with compost and mulch
If you need something taller for accessibility, or you want a raised garden beds that will truly last for decades without any rust, you might want to look at other options. For my small Florida backyard and my budget, these have been a very good fit.
Final Thoughts
These raised garden beds are not perfect, but they have held up far better than any wood option would in my yard, and the cost has made it possible for me to expand my garden without feeling guilty every time I click checkout.
If you take the time to fill them wisely, use compost and mulch, and keep an eye on your irrigation so sprinklers are not blasting the metal all day, they can give you many years of solid growing space.